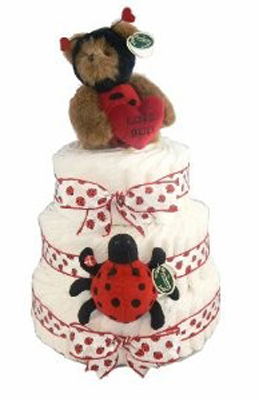
Ladybug Diaper Cake
A Fun Ladybug Centerpiece
 Instructions for a Ladybug Diaper Cake
A diaper cake is a wonderfully creative gift for an expectant mother. It is a collection of diapers, either disposable or cloth, rolled and stacked together to resemble a traditional tiered cake. There can be 1, 2, 3 or more tiers. The tiers of diaper cakes are also garnished with baby care items such as bibs, pacifiers, silverware, toys, and other items. An adorable Ladybug Diaper Cake is easy to make and we have some special Ladybug Baby Items to assist in decorating the Ladybug Diaper Cake!
Here are some of the items you will need to build and decorate your Ladybug Diaper Cake:
- Approximately 60 diapers (depends on how big you make it)
- Ribbon, 0.25 inches wide to tie rolled diapers
- 36-60 small rubber bands
- 6 large rubber bands
- One large bottle of baby lotion
- One 4-oz baby bottle
- A cardboard or plastic cake platter
- Baby items to decorate the cake
- Ladybug LoveBug or Ladybug Hugs Blanket for the top
Build the First Tier:
Take about 35 diapers, unfold 17 of them and, one at a time, roll them up tight, starting from the front of the diaper and rolling it to the back. The tighter the better. Place a rubber band around the center after you roll each diaper up to hold it tight. These are the inner diapers for the cake. Take the cake platter and place the large bottle of baby lotion in the center. Then place about 5-6 diapers around the bottle and put a large rubber band around the entire ring of diapers. Next form a 2nd ring with the remaining 11-12 diapers by placing them around the 1st ring of diapers. Complete it by placing a large rubber band around the 2nd ring. Now for the final ring of diapers for the 1st tier, take 18-20 diapers, unfold each one, roll them up tight like before, but instead of a rubber band around each one, tie a thin, 0.25 inch wide piece of ribbon around the middle around each one. Then place them around the second ring to form a 3rd ring. Now take the Ladybug Ribbon and tie it around the entire tier to hold them all together in a circle shape.
Build the Second Tier:
The second tier is made much the same way, only instead of 3 rings, you will only make 2 rings of diapers. Just like the 1st tier, the inside ring will need about 5-6 diapers. Part of the lotion bottle will be sticking out of the 1st tier, so place your 5-6 diapers around it to form the 1st ring of the 2nd tier. The 2nd ring will need 11-12 diapers. Place a ribbon around each of the 2nd ring diapers and hold them all together in a circle with the Ladybug Ribbon.
Build the Third Tier:
It is easier to assemble this tier on a table and then place it on the rest of the cake after it is assembled. Start by placing the 4 oz bottle on the table. Then take 5-6 diapers and roll them up like before and tie them with the thin ribbon. Then place them around the 4-oz baby bottle and tie with the Ladybug Ribbon to hold the diapers together tightly in their place. Take the top tier and place it on the top.
Decorate the Ladybug Diaper Cake:
Add Ladybug Flip Flop Socks, Ladybug Onesie, etc. between the folds of the diaper. Tuck the larger items into the outer layer of ribbon. Add Ladybug Stickers and other Ladybug Baby Items to personalize the Ladybug Diaper Cake. Place a special Ladybug Item on top of the Ladybug Cake for the finishing touch!
